

Tempest Keep: The Eye Guide — Raid guide · WoW Wrath of the Lich King
- Level
- 70
- Group
- 25 players
- Bosses
- 4
- Difficulty
- Raid
- Location
- Netherstorm
- Key
- None needed
Drops for your class
How the run goes
Tempest Keep's raid: Al'ar the phoenix, Void Reaver and High Astromancer Solarian in their own wings, and Kael'thas Sunstrider at the centre once all three are dead.
Group: Twenty-five players: tanks on Al'ar's platforms, a deep healing team for Void Reaver and Kael'thas, warlocks or a mage for Kael'thas's advisors, and a plan for who uses each legendary weapon.
Map and route
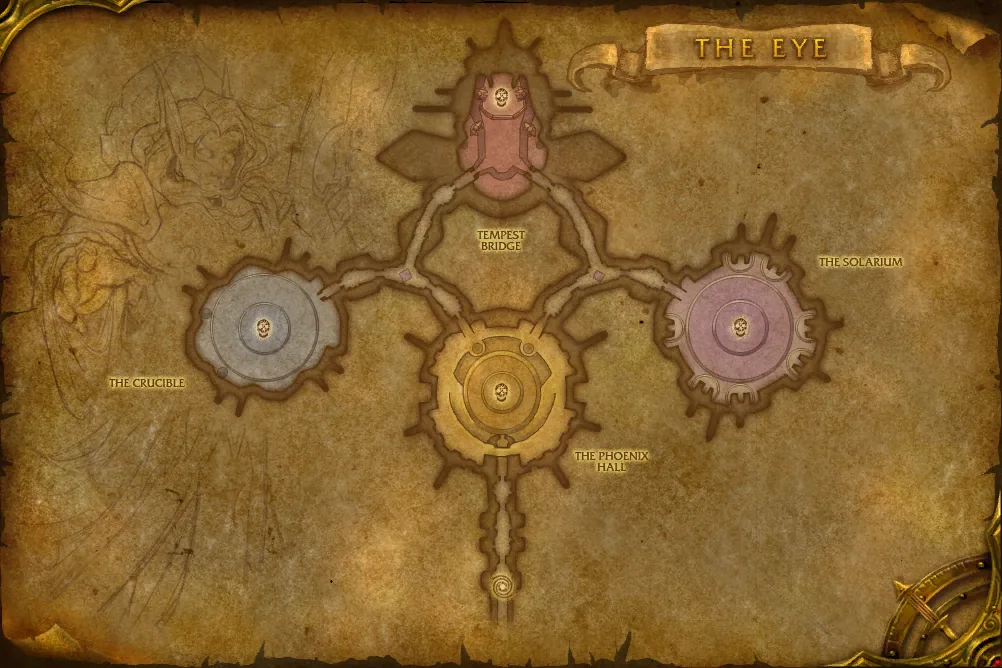
1.The three wings
From the entrance hall, take the wings in any order: Al'ar in the Phoenix Hall with its platforms, Void Reaver on his own platform, and High Astromancer Solarian in her observatory.
2.Kael'thas
With the three dead, the central hall opens to Kael'thas Sunstrider's throne room.
Boss by boss
The three wings
On the way: Crystalcore Devastators and Sentinels, Bloodwarder legionnaires and Star Scryers. The Crimson Hand packs near Solarian are mixed casters.
- Level
- 73 · Boss
- Health
- 2,124,640
- Armor
- 7,618
 Ember Blast
 Flame Quills
 Rebirth
 Dive BombDo damage divided up evenly among all affected targets
 BerserkIncreases the caster's attack speed by 150% and all damage it deals by 500% for 5 min.
 Flame BuffetInflicts Fire damage to an enemy.
 Melt Armor
 ChargeCharges an enemy, inflicting normal damage plus 99999 and stuns the opponent for 3 sec.
The phoenix god. In the first phase she flies between the platforms around the room, where a tank on each picks her up, and now and then flies to the centre and shoots Flame Quills down the ramps. When she 'dies', she's reborn on the floor for the second phase: Melt Armor on the tank, Flame Patches, Dive Bomb and Embers that explode.
- Platforms: tanks wait on each platform; the raid stays near the ramps and runs down them when she shoots Flame Quills.
- Floor: two tanks swap on Melt Armor; move out of Flame Patches and spread for Dive Bomb; kill Embers near her (their death hurts her).
- Tanks
- One tank per platform in the first phase; two on the floor swapping on Melt Armor in the second.
- Healers
- Flame Buffet stacks if no one is in melee; keep melee in range. Spread for Dive Bomb and heal through the embers' explosions.
- Damage dealers
- Kill Embers of Al'ar next to her so their explosion damages her; avoid Flame Patches.
- Level
- 73 · Boss
- Health
- 3,186,750
- Mana
- 3,387
- Armor
- 7,604
- BerserkIncreases the caster's attack speed by 150% and all damage it deals by 500% for 5 min.
 PoundingPounds the ground, damaging nearby enemies
 Arcane OrbDeals 4675 to 6325 Arcane damage to any enemies in the target area.
 Knock AwayInflicts normal damage plus 30 to an enemy and knocks it back.
A giant construct and a gear check. Pounding hits everyone in melee, Arcane Orbs fly at ranged players' positions, and Knock Away reduces the tank's threat, so several tanks stay high on threat. He berserks after a time limit.
- Tanks
- Three tanks keep similar threat so whoever is knocked away doesn't lose him.
- Healers
- Pounding hits melee constantly; ranged move away from Arcane Orbs' landing spot.
- Damage dealers
- Ranged spread out and move away from each orb; everyone pours on damage before the berserk.
- Level
- 73 · Boss
- Health
- 2,124,500
- Mana
- 254,025
- Armor
- 7,604
 Wrath of the Astromancer
 Blinding Light
 Mark of Solarian
 Psychic ScreamLets out a psychic scream, causing up to 5 nearby enemies to flee for 4 sec.
 Void BoltSends a bolt of dark magic at an enemy, inflicting 4394 to 5106 Shadow damage.
The astromancer casts Arcane Missiles and marks players with Wrath of the Astromancer, which explodes on them; they run away from the raid. Every so often she vanishes and Solarium Agents and Priests appear. At 20% she becomes a voidwalker that fears and casts Void Bolt.
- Astromancer: tank her; Wrath targets run out of the raid.
- Split: kill the agents and interrupt the priests' heals until she returns.
- Voidwalker (from 20%): fears and Void Bolts; burn her.
- Tanks
- Hold Solarian and pick up the agents and priests during the split.
- Healers
- Heal Wrath of the Astromancer targets as they run away; fear protection helps at the end.
- Damage dealers
- Run away from the raid if you're marked. Kill the priests in the split, interrupting their heals.

Kael'thas
On the way: Phoenix-Hawks and Crystalcore guards before the throne room.
- Level
- 73 · Boss
- Health
- 2,549,400
- Mana
- 1,693,500
- Armor
- 7,604
 FireballInflicts Fire damage to an enemy.
 Shock Barrier
 Mind Control
 Phoenix
 Arcane DisruptionCauses an explosion of arcane magic around the caster, causing 1750 to 2250 Arcane damage and disorienting all targets.
 Gravity Lapse
- PyroblastInflicts Fire damage to an enemy.
A five-phase fight. First his four advisors one at a time, then seven legendary weapons, then all four advisors raised together, then Kael'thas himself, and finally Gravity Lapse.
- Advisors: Thaladred the Darkener (gazes on a player who kites him), Lord Sanguinar (fears), Grand Astromancer Capernian (a caster, tanked by a warlock at range) and Master Engineer Telonicus (bombs).
- Weapons: kill the seven legendary weapons and loot them; their abilities help the rest of the fight.
- Advisors again: all four rise together; use the weapons and the previous assignments.
- Kael'thas: interrupt his Pyroblast after breaking Shock Barrier, kill the phoenixes and eggs, move out of Flamestrike, control mind-controlled players.
- Gravity Lapse: everyone floats; fly away from the Nether Vapor and keep damaging him.
- Tanks
- Tanks for each advisor, then Kael'thas and his phoenixes; Phaseshift Bulwark helps the main tank.
- Healers
- Every phase hits hard; Netherstrand Longbow and Cosmic Infuser users make healing easier. In Gravity Lapse, spread out in the air.
- Damage dealers
- Follow the advisor order, kill the weapons fast, break Shock Barrier and interrupt Pyroblast, and kill eggs before they hatch.
Before you go
- Agree on weapon looting and use during Kael'thas; the temporary weapons provide encounter-specific tools.
- Prepare coordinated tank movement for Al'ar and add assignments for Solarian.
- The Tempest Key was required in original early progression and removed later. Flying is needed for the original platform approach.