

Temple of Ahn'Qiraj Guide — Raid guide · WoW Burning Crusade
- Level
- 60
- Group
- 40 players
- Bosses
- 9
- Difficulty
- Raid
- Location
- Silithus
- Key
- None needed
How the run goes
The forty-player qiraji temple and the old god C'Thun in its depths. The path runs from The Prophet Skeram through Sartura, Fankriss and Huhuran to the Twin Emperors and C'Thun; the Bug Trio, Viscidus and Ouro are optional.
Group: Forty players with six or more tanks (one of them a warlock for Vek'lor), plenty of healers, nature resistance for Huhuran's soakers, frost damage for Viscidus and a clear entry plan for C'Thun.
Map and route
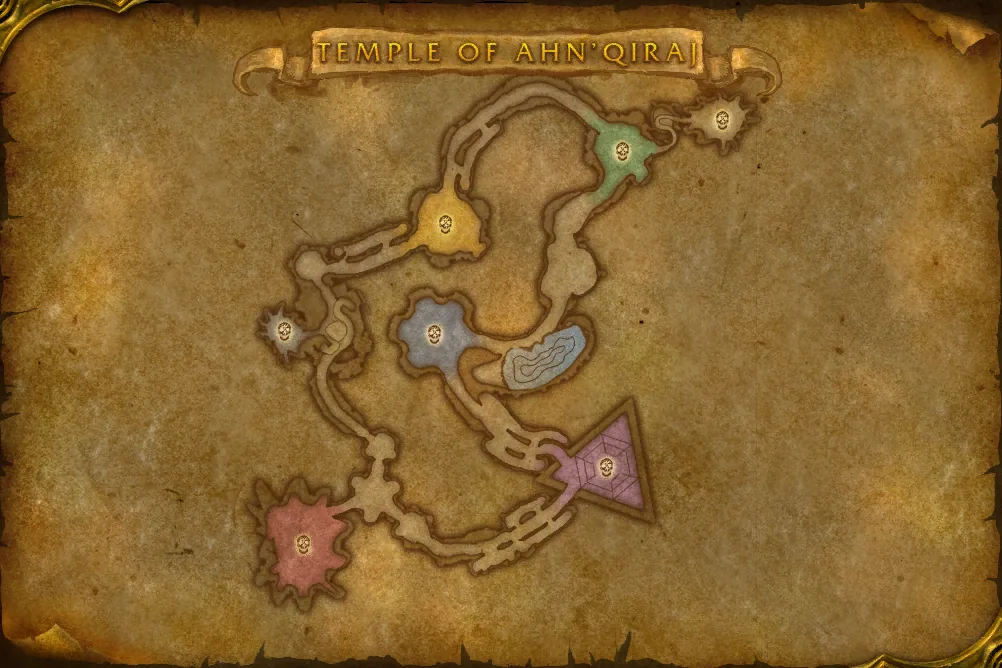
From the entrance to the Prophet Skeram, then down into the hive tunnels: the Bug Trio, Battleguard Sartura and Fankriss, a side trip to Viscidus, then Princess Huhuran and the Twin Emperors before C'Thun.
! marks a quest giver inside the instance; select it for the quest.
1.Skeram and the Bug Trio
From the entrance up to The Prophet Skeram's platform, then down into the hive where the Bug Trio, Lord Kri, Princess Yauj and Vem, wait.
2.Sartura, Fankriss and Viscidus
To Battleguard Sartura and her Royal Guards, through the hive to Fankriss the Unyielding, and optionally to Viscidus in his pool.
3.Huhuran and the Twin Emperors
On to Princess Huhuran's chamber, then the Twin Emperors' hall, with Ouro reachable afterwards in his lair.
4.C'Thun
Down into C'Thun's chamber. Enter spread out, as planned: the Eye's beam jumps between players standing together.
Boss by boss
Skeram and the Bug Trio
On the way: Anubisath Sentinels share their abilities when one dies: kill them evenly. Obsidian Eradicators drain mana.
- Level
- 63 · Boss
- Health
- 466,375
- Mana
- 393,000
- Armor
- 3,795
 Birth
- Summon Images
 Arcane ExplosionSends out a blast wave of magic, inflicting Arcane damage to nearby enemies.
 True Fulfillment
 Earth ShockShocks an enemy with concussive force, inflicting Nature damage and interrupting the spell being cast for 2 sec.
A qiraji prophet on a platform with stairs to the left and right. He casts Arcane Explosion around himself, hits his target with Earth Shock, mind-controls players with True Fulfillment, and at 75%, 50% and 25% health splits into three copies, two of them images with less health. He also teleports between the platforms.
- Before each split: tank him on the central platform; interrupt Arcane Explosion and let the mind-controlled players be crowd-controlled, not killed.
- At each split: three Skerams appear on the three platforms. Each platform's tank picks one up; the raid kills the images and finds the real one (the copies vanish when he dies).
- Tanks
- Three tanks, one per platform. After each teleport or split, pick up whichever Skeram lands on your platform. Earth Shock hits hard: keep a cooldown for it.
- Healers
- Spread out across the platforms so a split never leaves a tank without a healer. Mind-controlled players attack the raid: crowd-control them with Polymorph, Sap or Fear rather than letting them die.
- Damage dealers
- Interrupt Arcane Explosion every time; melee stand behind him. At each split, kill the images on your platform quickly, then switch to the real Skeram.
- Level
- 63 · Boss
- Health
- 266,480
- Mana
- 48,984
- Armor
- 4,691
 Summon Poison Cloud
 CleaveInflicts weapon damage plus 200 to an enemy and its nearest allies, affecting up to 3 targets.
 Toxic VolleyInflicts Nature damage to an enemy.
 Great HealCalls upon Holy magic to heal an ally.
 FearStrikes fear in an enemy, causing it to flee in terror for up to 8 sec. Only 1 target can be feared at a time.
 RavageInflicts normal damage plus 3 to an enemy, stunning it for 2 sec.
 DispelDispels magic on an ally, removing 5 harmful spells.
 Vengeance
Three royal bugs fought at once, each tanked apart. Lord Kri cleaves and casts Toxic Volley and leaves a poison cloud when he dies. Princess Yauj heals the others with Great Heal, fears the raid and dispels, and releases a brood of bugs when she dies. Vem charges and knocks back. Each death enrages the survivors with Vengeance.
- Tanks
- One tank on each bug, spread apart so Yauj's fear and Kri's volley hit as few players as possible. Vem knocks you back: keep your back to a wall.
- Healers
- Toxic Volley poisons the whole raid: cure poison and heal widely. After Yauj's fear, check who ran into another bug.
- Damage dealers
- Agree a kill order (most raids take Kri or Yauj first). Interrupt every Great Heal, kill Yauj's brood with area damage, and move away from Kri's poison cloud when he dies.
Sartura, Fankriss and Viscidus
On the way: Qiraji Champions, Slayers and Mindslayers, and Vekniss stingers and soldiers in the hive.
- Level
- 63 · Boss
- Health
- 449,475
- Armor
- 4,691
- EnrageIncreases the caster's attack speed by 60% and the Physical damage it deals by 50 for 2 min.
 WhirlwindAttacks nearby enemies in a whirlwind of steel that lasts 15 sec. and inflicts normal damage plus 85.
 Sundering CleaveInflicts normal damage plus 30 to an enemy and its nearest allies, affecting up to 3 targets. Hits also reduce armor by 240.
- BerserkIncreases the caster's movement speed by 150% and the Physical damage it deals by 500 for 10 min.
Sartura and three Sartura's Royal Guards whirlwind through the room, picking random targets, and cleave whatever is in front of them. Sartura enrages at low health and berserks after a time limit.
- Tanks
- Four tanks: one on Sartura and one on each guard. After every whirlwind they lose interest in you, so pick them back up the moment it ends. Stuns on the guards keep them in place.
- Healers
- Whirlwind hits whoever she spins into. Stay spread out at range, and heal the tanks hard after each whirlwind when they pick the bosses back up.
- Damage dealers
- Kill the guards first (stunning them in rotation) or burn Sartura, as the raid plans. Never chase a whirlwinding boss through the raid; let it come to the tank.
- Level
- 63 · Boss
- Health
- 999,300
- Armor
- 4,691
- Summon Worm
 Mortal Wound
A giant bug whose Mortal Wound stacks on the tank and cuts the healing they receive. He calls Spawns of Fankriss, which enrage if left alive, and Vekniss hatchlings pour from the tunnels while players are webbed in place in the corners.
- Tanks
- Two or three tanks swap on Mortal Wound stacks. Off-tanks pick up each Spawn of Fankriss the moment it appears.
- Healers
- Mortal Wound makes heals on the tank weaker as it stacks: heal the fresh tank after each swap. Webbed players in the tunnels need heals while the hatchlings reach them.
- Damage dealers
- Kill the Spawns of Fankriss as soon as they appear, then the hatchlings around webbed players, then go back to Fankriss.
- Level
- 63 · Boss
- Health
- 1,998,600
- Armor
- 4,691
- Rejoin Viscidus
 Poison Shock
- Poison Bolt VolleyShoots poison at an enemy, inflicting Nature damage, then additional damage every 2 sec. for 10 sec.
An optional poison ooze. Frost damage slows and then freezes him; once frozen, enough melee hits shatter him into globs that crawl back to rejoin him. Every glob killed takes away part of his health. He volleys poison bolts and leaves toxin clouds.
- Freeze: the raid hits him with frost spells, frost oil on weapons and frost wands until he freezes solid.
- Shatter: melee hit him as fast as they can until he breaks into globs.
- Globs: everyone kills the globs before they reach the centre; each one that dies lowers his health.
- Tanks
- Hold him in the middle so the globs have far to travel, and keep him away from his toxin clouds.
- Healers
- Poison Bolt Volley and the clouds poison the raid throughout: cure poison and heal widely.
- Damage dealers
- Use every frost source you have for the freeze, fast melee hits for the shatter, and area damage on the globs.
Huhuran and the Twin Emperors
On the way: Anubisath Defenders and Warders before the Twins. Ouro's path is short.
- Level
- 63 · Boss
- Health
- 999,300
- Armor
- 4,691
 Berserk
- Frenzy
- Acid SpitInflicts Nature damage to an enemy every 2 sec. for 30 sec.
- Noxious Poison
 Wyvern StingA stinging shot that puts the target to sleep for 12 sec. Any damage will cancel the effect.
A giant wasp who spits acid on the tank, silences with Noxious Poison and puts players to sleep with Wyvern Sting, which hurts when dispelled. She frenzies (tranquilize it) and below about a third of her health berserks, volleying poison at the nearest players.
- Main phase: tank her, tranquilize each Frenzy and hold dispels of Wyvern Sting until they're needed.
- Berserk: nature-resistant soakers stand close to her so her Poison Bolt Volley hits them, while the raid burns her down.
- Tanks
- Hold her still; Acid Spit stacks on you. A hunter on Tranquilizing Shot is part of your survival.
- Healers
- Wyvern Sting deals damage when dispelled: dispel only the players you must. In the berserk phase, the soakers take huge poison damage.
- Damage dealers
- Everything into the last phase: the faster she dies after berserking, the fewer soakers fall.
- Level
- 63 · Boss
- Health
- 1,732,250
- Mana
- 471,600
- Armor
- 4,656
 Heal BrotherHeal the target for 30000
 Explode Bug
- EnragePeriodically cast a powerful Arcane Explosion
 Shadow BoltHurls a bolt of dark magic at an enemy, inflicting Shadow damage.
 BlizzardIce shards pelt the target area doing 6940 Frost damage over 10 sec.
- Arcane Burst
 Mutate Bug
- BerserkIncreases the caster's movement speed by 150% and the Physical damage it deals by 500 for 10 min.
Two emperors who heal each other when they stand close. Vek'lor is a caster immune to physical damage (Shadow Bolt, Blizzard, Arcane Burst); Vek'nilash fights in melee and is immune to magic. Every half minute or so they swap places, and bugs in the room explode or mutate when the emperors use them. They berserk after a time limit.
- Tanks
- Keep the emperors at opposite ends of the room. Vek'lor is tanked by a warlock (his threat comes from spells); Vek'nilash by warriors. After each teleport the tanks on each side pick up whichever emperor arrives.
- Healers
- Split healers between the two ends. Blizzard and Arcane Burst hit casters near Vek'lor; exploding bugs hurt whoever stands near them.
- Damage dealers
- Casters on Vek'lor, melee and hunters on Vek'nilash; after each teleport, switch to the emperor on your side. Keep their health even so they die together.
- Level
- 63 · Boss
- Health
- 1,998,600
- Armor
- 4,691
 Sand Blast
- Summon Ouro Mounds
 Ground Rupture
- Birth
- Berserk
 Sweep
 BoulderHurls a boulder at an enemy, inflicting Physical damage.
An optional giant sandworm. He sweeps everyone around him away, blasts sand in a cone that stuns and drops threat, and submerges to chase players with Ground Rupture and dirt mounds. If no one is in melee range he throws boulders. At low health he berserks and scarabs swarm.
- Tanks
- Two tanks in front of him: Sand Blast stuns the first and the second picks him up. When he surfaces, be the first in melee range.
- Healers
- Sweep knocks melee back and hurts; heal through it. During submerge, heal whoever the dirt mounds reach.
- Damage dealers
- Stay behind him. When he submerges, move away from the rumbling ground and the mounds; burn him hard in the berserk phase.
C'Thun
- Level
- 63 · Boss
- Health
- 999,300
- Armor
- 4,691
- Ground Rupture
 HamstringInflicts weapon damage plus 657 to 843 to an enemy, reducing its movement speed by 70% for 10 sec.
- Ground TremorStuns nearby enemies, rendering them unable to move or attack for 2 sec.
The old god at the bottom of the temple. First the Eye of C'Thun fights alone; when it dies, C'Thun's body rises. Throughout, tentacles erupt from the floor: Eye Tentacles mind-flay, Claw Tentacles hit melee.
- The Eye: its Eye Beam jumps between players who stand close together, so the raid spreads in a ring around the room. Every so often it turns red and sweeps Dark Glare across the room; the raid moves around the ring away from it. Kill tentacles as they rise.
- C'Thun: he swallows players one by one into his stomach. Inside, they kill the two Flesh Tentacles to weaken him and leave through the exit before the acid stacks too high. When weakened, the raid outside burns him; between weakened phases, giant claw and eye tentacles rise and must die.
- Tanks
- Tanks pick up the giant claw tentacles in the second phase and Claw Tentacles near the melee in the first.
- Healers
- Stay spread out in the first phase so the Eye Beam can't chain through you. In the second, swallowed players come out with acid stacks: heal them.
- Damage dealers
- Kill Eye Tentacles at once: their Mind Flay hurts. Inside the stomach, kill the Flesh Tentacles fast; outside, burn C'Thun whenever he's weakened.

Before you go
- Prepare nature resistance for Huhuran's progression strategy and shadow resistance for Twin Emperors' caster tank.
- Bring frost attacks and fast melee hits if attempting Viscidus.
- Mark C'Thun entrance positions in advance; entering in a clump can kill the raid immediately.
- No personal scepter or attunement is needed once the realm gates are open. Resistance preparation is encounter-specific.