

Zul'Farrak Guide — Dungeon guide · WoW Wrath of the Lich King
- Level
- 44–54
- Group
- 5 players
- Bosses
- 12
- Difficulty
- Normal
- Location
- Tanaris
- Key
- None needed
Drops for your class
How the run goes
An open troll city in Tanaris rather than a corridor. The usual run takes the Sacred Pool (Hydromancer Velratha, and Gahz'rilla if you carry the Mallet of Zul'Farrak), the graveyard and temple bosses, then the big pyramid event where you free Sergeant Bly's crew and hold the stairs, and ends with Chief Ukorz Sandscalp at the top of the final temple.
Group: A tank, a healer and three damage dealers from around level 45. Trolls come in mixed packs with healers and casters; the pyramid event needs a tank who can hold many enemies and a healer with mana to spare.
Map and route
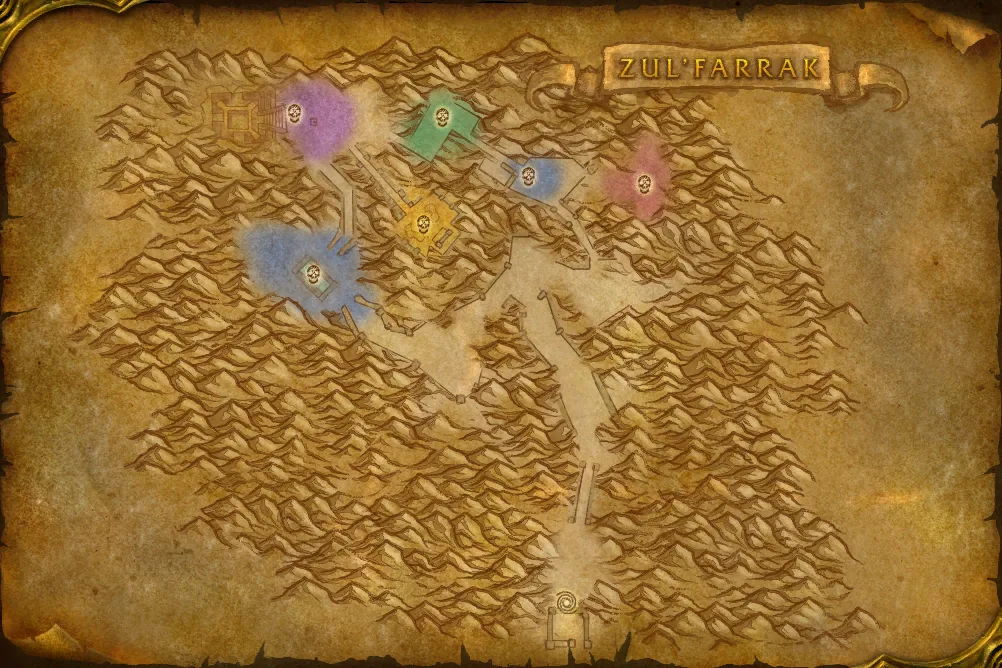
From the gate to Hydromancer Velratha at the Sacred Pool, the temples of Theka and Antu'sul and Zum'rah's graveyard, then up the pyramid to free Sergeant Bly and hold the stairs, and finally Chief Ukorz Sandscalp's temple.
- strategy
- strategy
- strategy
- strategy
- strategy
- strategyA rare spawn: not always there.
- strategyA rare spawn: not always there.
- strategyComes up the pyramid stairs with Shadowpriest Sezz'ziz after the last wave.
- strategyFights beside Nekrum Gutchewer at the top of the pyramid.
- strategy
- strategy
- strategy
1.The Sacred Pool
Head for the Sacred Pool, where Hydromancer Velratha stands at the water's edge. If someone has the Mallet of Zul'Farrak, strike the gong at the pool to summon Gahz'rilla.
2.The temples and graveyard
Through the city to Theka the Martyr's temple and Antu'sul's basilisk cave, then to the graveyard, where Witch Doctor Zum'rah raises the dead. Zerillis and Sandarr Dunereaver are rare spawns in the streets.
3.The pyramid
Clear the pyramid's base, climb it and open the cages to free Sergeant Bly and his crew. Trolls then swarm up the stairs in waves; hold the top with Bly's crew until Nekrum Gutchewer and Shadowpriest Sezz'ziz come. Afterwards, Bly's crew turns on you if you speak to Bly.
4.The chief's temple
Past the pyramid and up the long stairs of the last temple to Chief Ukorz Sandscalp and his lieutenant Ruuzlu.
Boss by boss
The Sacred Pool
On the way: Sandfury troll packs with shadowcasters and hexers. Pull them away from the pool's edge so runners don't bring more.
- Level
- 46 · Elite
- Health
- 4,029
- Mana
- 7,846
- Armor
- 2,220
 Healing WaveCalls upon Nature magic to heal an ally.
 Ward of Zum'rahCasts a Ward of Zum'rah totem, which lasts 20 sec. and periodically summons a Skeleton of Zum'rah. Each Skeleton lasts 20 sec.
 Shadow Bolt VolleyHurls missiles of dark magic, inflicting Shadow damage to nearby enemies.
- Shadow BoltHurls a bolt of dark magic at an enemy, inflicting Shadow damage.
A troll caster at the Sacred Pool who casts Shadow Bolt and Shadow Bolt Volley and heals with Healing Wave.
- Tanks
- Clear the trolls around the pool first, then hold her away from the water's edge.
- Healers
- Shadow Bolt Volley hits everyone; heal the group between volleys.
- Damage dealers
- Interrupt her Healing Wave and kill her quickly: she's a short caster fight.
- Level
- 46 · Elite
- Health
- 19,190
- Armor
- 2,750
 Freeze SolidStuns an enemy and inflicts 93 to 107 Frost damage every 3 sec. for 10 sec.
 Gahz'rilla SlamInflicts normal damage plus 50 to nearby enemies and knocks them back.
 IcicleShoots a bolt of ice, inflicting 350 to 400 Frost damage to an enemy and slowing its movement by 50% for 10 sec.
A giant hydra summoned at the pool's gong with the Mallet of Zul'Farrak. He freezes players solid, throws Icicles and slams the tank into the air.
- Tanks
- Fight on solid ground with room behind you: Gahz'rilla Slam throws the tank.
- Healers
- Frozen players can't act; heal everyone else and wait for the ice to break.
- Damage dealers
- Stay out of his front and keep up damage; he has no adds.
The temples and graveyard
On the way: Scarabs swarm near Theka and basilisks guard Antu'sul. Don't open graves while the healer drinks: each one can release zombies.
- Level
- 45–46 · Elite
- Health
- 9,595
- Armor
- 2,750
 Fevered PlagueInflicts 250 Nature damage to an enemy, then an additional 11 damage every 5 sec. for 3 min.
A troll priest who spreads Fevered Plague and, partway through, transforms and becomes immune to physical damage for a time.
- Tanks
- Clear the scarabs around him first and hold him through the transformation.
- Healers
- Remove the plague if you can cure diseases; otherwise heal through it.
- Damage dealers
- When he's immune to physical damage, casters keep hitting and melee wait rather than waste cooldowns.
- Level
- 46 · Elite
- Health
- 12,280
- Mana
- 12,696
- Armor
- 2,749
 Earthgrab TotemSummons an Earthgrab Totem that lasts 30 sec. and periodically immobilizes nearby enemies.
 Healing WardSummons a ward that lasts 30 sec. and periodically heals allies in an area around it.
 Antu'sul's Minion
 Healing Wave of Antu'sulHeal your target for 2220 to 2580.
A troll shaman in the basilisk cave who drops healing wards and Earthgrab Totems and calls basilisk minions to help him as he gets hurt.
- Tanks
- Clear the basilisks on the approach, then pick up every minion he calls and keep them off the healer.
- Healers
- Damage jumps when his basilisks arrive; keep the tank high before he calls them.
- Damage dealers
- Kill his Healing Ward and totems quickly, then the basilisks, then Antu'sul.
- Level
- 46 · Elite
- Health
- 10,745
- Mana
- 6,348
- Armor
- 2,749
- Summon Zul'Farrak Zombies
- Shadow BoltHurls a bolt of dark magic at an enemy, inflicting Shadow damage.
- Shadow Bolt VolleyHurls missiles of dark magic, inflicting Shadow damage to nearby enemies.
- Ward of Zum'rahCasts a Ward of Zum'rah totem, which lasts 20 sec. and periodically summons a Skeleton of Zum'rah. Each Skeleton lasts 20 sec.
- Healing WaveCalls upon Nature magic to heal an ally.
The graveyard's witch doctor. He raises zombies from the graves, casts Shadow Bolt and Shadow Bolt Volley, and heals with Healing Wave behind a protective ward.
- Tanks
- Pull him away from unopened graves and pick up every zombie that rises.
- Healers
- Shadow Bolt Volley hits the whole group: keep everyone topped up.
- Damage dealers
- Interrupt his heals, destroy his ward, and use area damage on the zombies.
- Level
- 45 · Rare elite
- Health
- 5,544
- Armor
- 2,695
 NetImmobilizes an enemy for 10 sec.
 Frost ShotShoots at an enemy, inflicting 0 additional Frost damage and slowing its movement by 60% for 10 sec.
A rare troll hunter on patrol who nets players and fires Frost Shot.
- Tanks
- Pull him away from the troll packs along his path.
- Healers
- Light damage; Net only roots its target in place, so heal from range and stay mobile.
- Damage dealers
- Kill him quickly when his patrol comes past, before he walks into another pack.
- Level
- 45 · Rare elite
- Health
- 5,544
- Armor
- 2,695
 Demoralizing ShoutReduces the melee attack power of nearby enemies by 10 for 30 sec.
 PummelPummels an enemy for 45 damage and interrupts the spell being cast for 5 sec.
A rare Sandfury warrior who pummels and uses Demoralizing Shout.
- Tanks
- Clear the courtyard around him first, then hold him.
- Healers
- Pummel interrupts casts: start your heals early if he's near you.
- Damage dealers
- Kill him quickly: he's a rare with no adds, so it's a straight damage race.
The pyramid
On the way: The pyramid waves are the hardest part of the dungeon. Stay at the top of the stairs together and let the tank gather the trolls.
- Level
- 45 · Elite
- Health
- 5,544
- Armor
- 2,695
- Fevered PlagueInflicts 250 Nature damage to an enemy, then an additional 11 damage every 5 sec. for 3 min.
A troll ghoul at the end of the pyramid waves who spreads Fevered Plague.
- Tanks
- Hold him at the top of the stairs with the last wave, keeping Bly's crew in the fight.
- Healers
- Remove the plague if you can and keep mana for Sezz'ziz, who comes at the same time.
- Damage dealers
- Kill Shadowpriest Sezz'ziz first if he's healing, then Nekrum; both come at the end of the stairs event.
- Level
- 46 · Elite
- Health
- 7,675
- Mana
- 3,174
- Armor
- 2,749
 Psychic ScreamLets out a psychic scream, causing up to 5 nearby enemies to flee for 6 sec.
 RenewHeals an ally for 5 damage every 3 sec. for 20 sec.
 HealCalls upon Holy magic to heal an ally.
- Shadow BoltHurls a bolt of dark magic at an enemy, inflicting Shadow damage.
The priest leading the pyramid's last wave. He heals, casts Shadow Bolt and fears with Psychic Scream.
- Tanks
- Pick him up quickly; Psychic Scream scatters the group, so pick up loose trolls after each fear.
- Healers
- Fears can send you down the stairs into trolls; heal whoever ends up in trouble.
- Damage dealers
- Interrupt his Heal and Renew and kill him before Nekrum.
- Level
- 45 · Elite
- Health
- 18,480
- Armor
- 2,695
 RevengeInstantly counterattack an enemy for 16 to 20 damage. Revenge must follow a block, dodge, or parry.
 Shield BashBashes an enemy with the caster's shield, inflicting Physical damage and interrupting the spell being cast for 8 sec.
The leader of the crew you freed. After the pyramid, speaking to him turns his crew hostile; he uses Shield Bash and Revenge.
- Tanks
- Rest first. When you speak to Bly, pick up him and his crew together.
- Healers
- Several crew members attack at once: keep the tank and anyone they reach topped up.
- Damage dealers
- Focus one crew member at a time, the casters first.
The chief's temple
- Level
- 45 · Elite
- Health
- 9,240
- Armor
- 2,695
 ExecuteAttempts to finish off a wounded enemy, inflicting normal damage plus 50. Execute can only be used on enemies that have 20% or less health.
 CleaveInflicts weapon damage plus 10 to an enemy and its nearest ally.
Chief Ukorz Sandscalp's lieutenant, with Cleave and Execute, fought together with the chief.
- Tanks
- Pick him up with the chief, or let an off-tank hold him away from the group.
- Healers
- His Execute hits hard on low-health targets: keep whoever he hits above half health.
- Damage dealers
- Kill him first so Chief Ukorz Sandscalp stands alone, then switch to the chief.
- Level
- 46 · Elite
- Health
- 13,433
- Armor
- 2,750
 EnrageIncreases the caster's attack speed by 60% and the Physical damage it deals by 50 for 2 min.
- Wide SlashInflicts normal damage plus 3 to enemies in a cone in front of the caster.
- CleaveInflicts weapon damage plus 10 to an enemy and its nearest ally.
The Sandfury chief at the top of the last temple, fought with Ruuzlu. He cleaves, uses Wide Slash and enrages at low health.
- Tanks
- Hold the chief and keep him turned away from the group; Ruuzlu needs a second tank, crowd control or a quick kill.
- Healers
- Two heavy hitters at once until Ruuzlu dies, then the chief's enrage at the end.
- Damage dealers
- Kill Ruuzlu first, then the chief; burn him hard as he enrages.
Before you go
- Clear the pyramid approach before freeing the prisoners and beginning the defense.
- Opening graves can spawn extra enemies; do not open several while the healer is drinking.
- Have the party agree whether it needs the mallet boss before starting the run.
- No entrance key. The Mallet of Zul'Farrak is needed to ring the gong for Gahz'rilla; see the dedicated unlock guide.